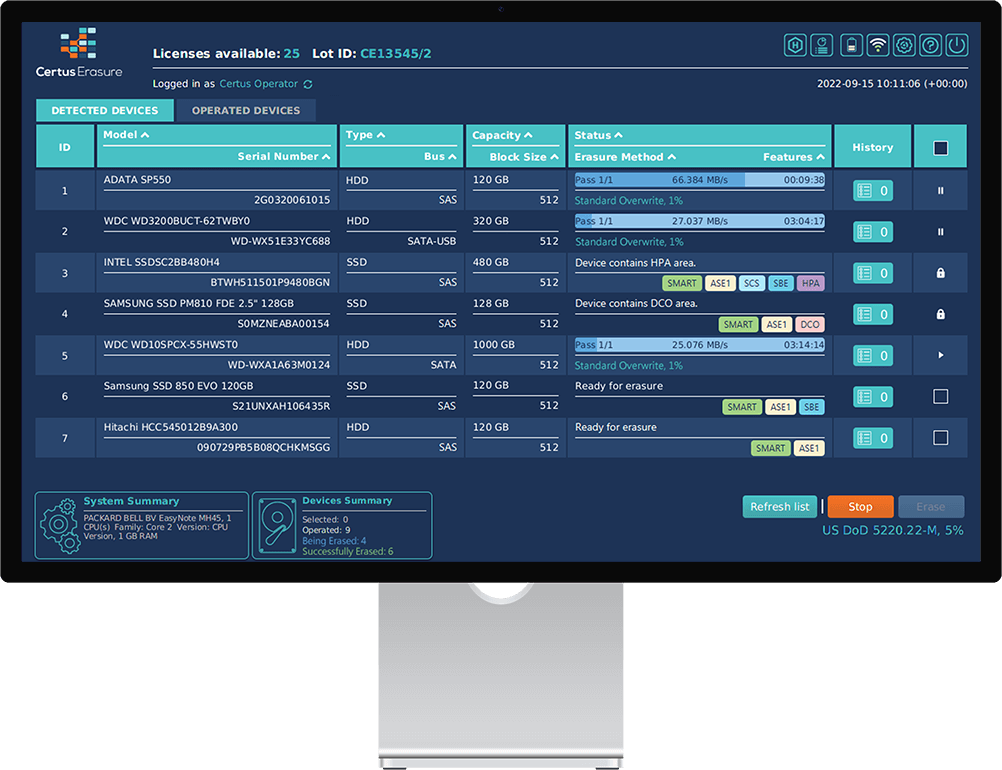
The Certus Erasure module is a certified product for securely and permanently deleting data stored in laptops, PCs, servers, and storage environments, as well as external media devices (USB sticks and single drives).
Each verified erasure provides a tamper-proof data erasure certificate, showing the following information:
Certus Software has the full infrastructure to ensure it is compliant with GDPR and NIST 800-88. It also meets national and global data protection regulations.
Using Certus Software is a way of taking social responsibility, as this secure, cost effective, eco-friendly product makes it possible for IT equipment to safely be reused to help keep the planet green.
The Cloud solution provides centralized control and reporting features for the entire data erasure process, convenient access, plus a safe and secure environment for all parties involved in the process.
The Advantages :
The software has boot support for both UEFI and Legacy (BIOS) firmware. You need an USB drive or blank CD/DVD to create a bootable Certus Erasure media device. You can create the bootable device and download Certus Erasure Software via the Certus USB-Tool. The Certus USB-Tool is available in Certus Erasue Web Manager.
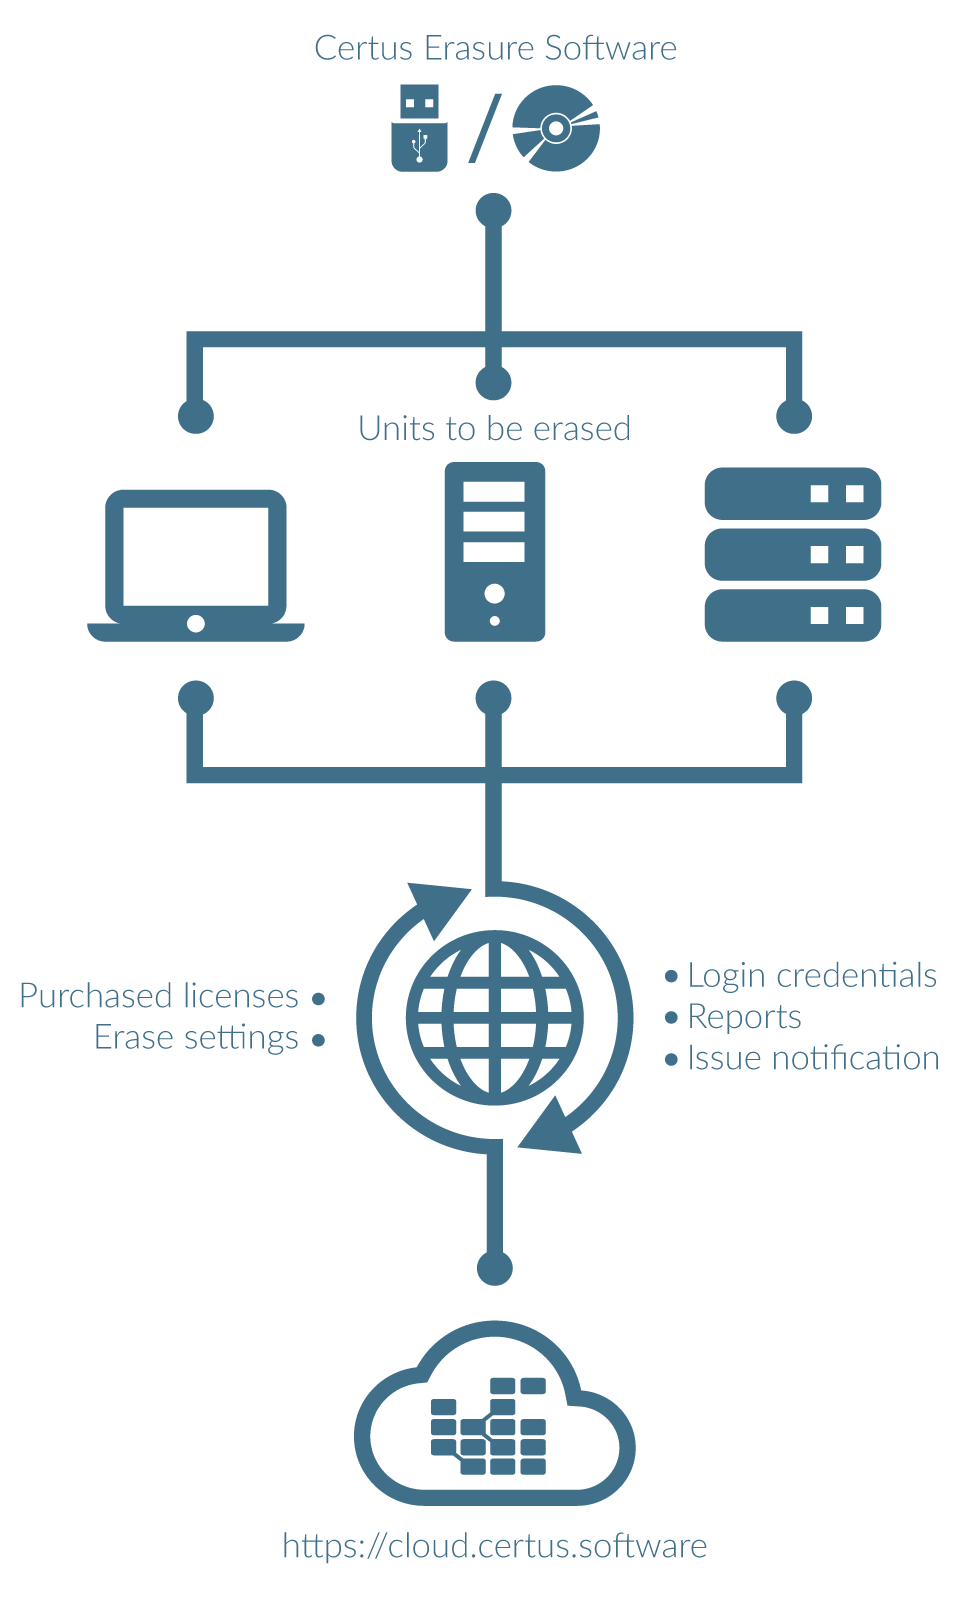
An Internet connection is required to login to your Certus cloud account to access purchased licenses and define erasure settings. During the erasure process, no information is sent over the Internet. All network transmissions are protected by security encryption protocol TLS v1.3
Download an image of Certus Erasure Software from your CEWM account. Use this image to prepare a bootable USB drive. To start Certus Erasure Software, select USB in the boot menu of the unit that needs to be erased.
Start a machine using the prepared bootable USB drive. Use your Certus account login credentials to sign in at the software start. Ensure your machine is connected to the Internet.
Set the necessary erasure pattern and verification level. Select the drives for erasure. “Unfreeze“ drives if needed and start the erasure process.
After the erasure process has been completed, an erasure report is generated. You can save the erasure report in your Certus cloud account or on an external storage drive.
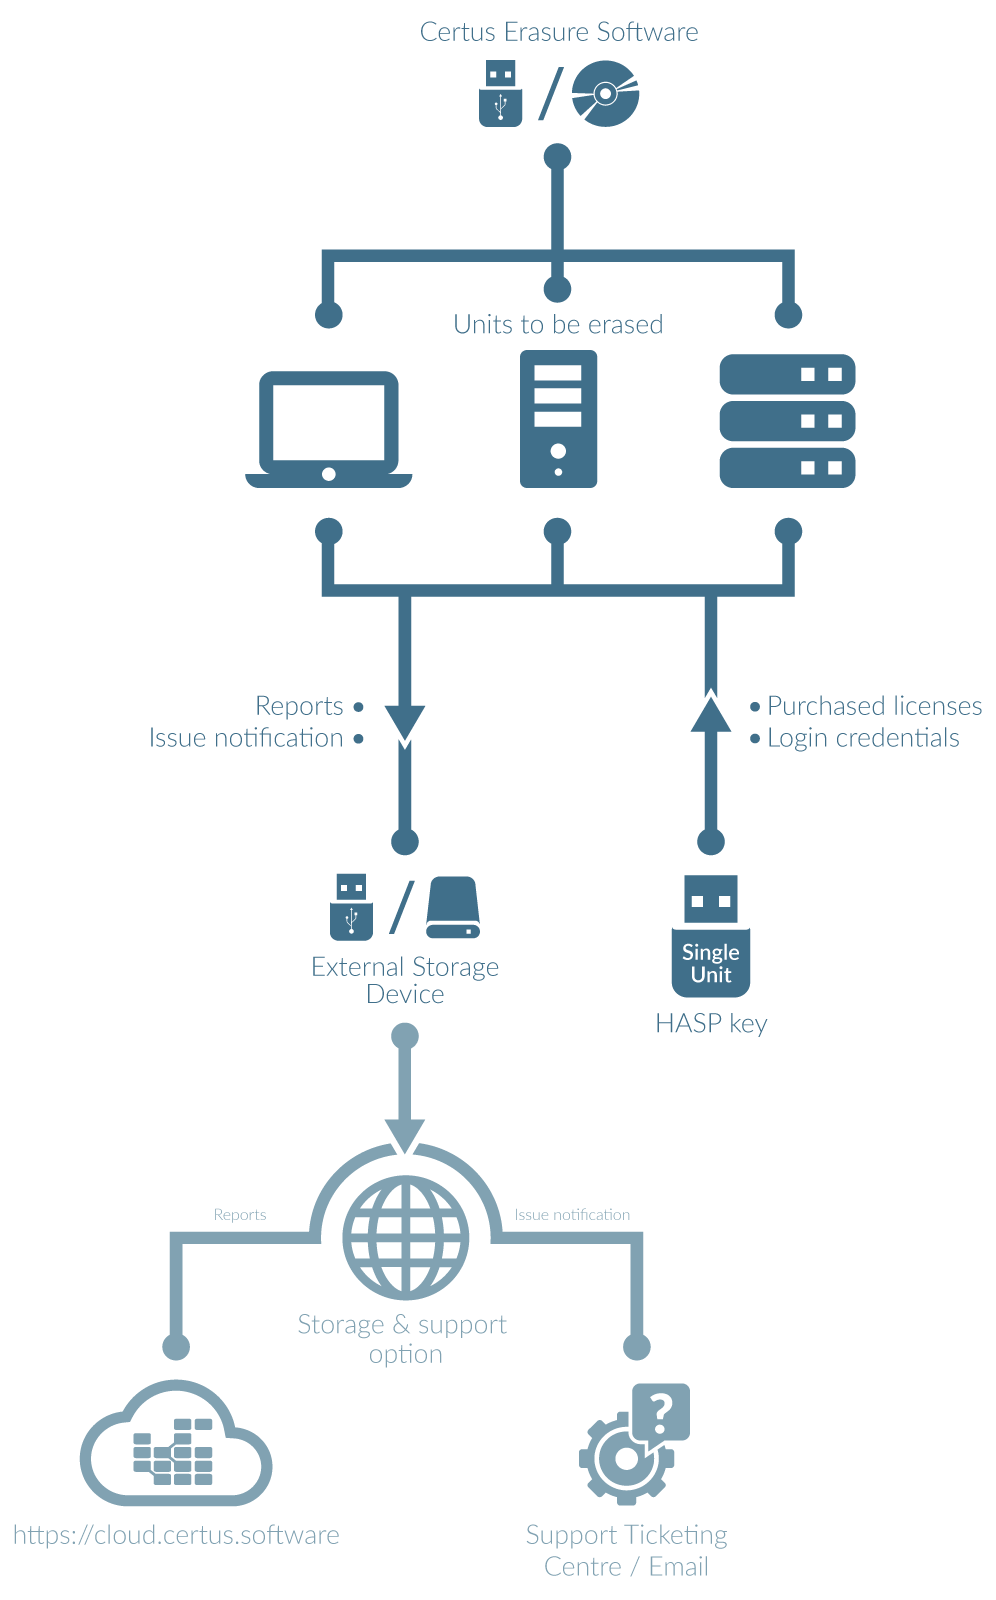
Use the certified data erasure software as a secure offline solution on your local target computer where no Internet is available or allowed.
The Advantages :
The software has boot support for both UEFI and Legacy (BIOS) firmware. You need an USB drive or blank CD/DVD to create a bootable Certus Erasure media device. You can create the bootable device and download Certus Erasure Software via the Certus USB-Tool. The Certus USB-Tool is available in Certus Erasue Web Manager.
A Single Unit HASP Key is required to login to Certus Erasure Software. The key contains login credentials and purchased licenses. Additional licenses can be purchased and added to your dedicated HASP Key.
All your erasure activities such as erasure, hardware audit or issue reports should be saved on an external storage device for archiving. Note that reports can not be saved on the bootable USB drive and HASP Key.
Saved reports can be imported to the Certus Software Web Manager. The HASP Key ID should be linked to your Cloud account (available upon request).
Download an image of Certus Erasure Software from your CEWM account. Use this image to prepare a bootable USB drive. To start Certus Erasure Software, select USB in the boot menu of the unit that needs to be erased.
Start a machine using the prepared bootable USB drive. Use your Single Unit HASP Key to sign in at the software start. Login will be started automatically.
Set the necessary erasure pattern and verification level. Select the drives for erasure. “Unfreeze“ drives if needed and start the erasure process.
After the erasure process has been completed you can generate an erasure report and save it on an external storage device.
Deploy our solution to multiple machines using our WDS network based PXE deployment. Through an API we can integrate it directly into your own ERP.
The Advantages :
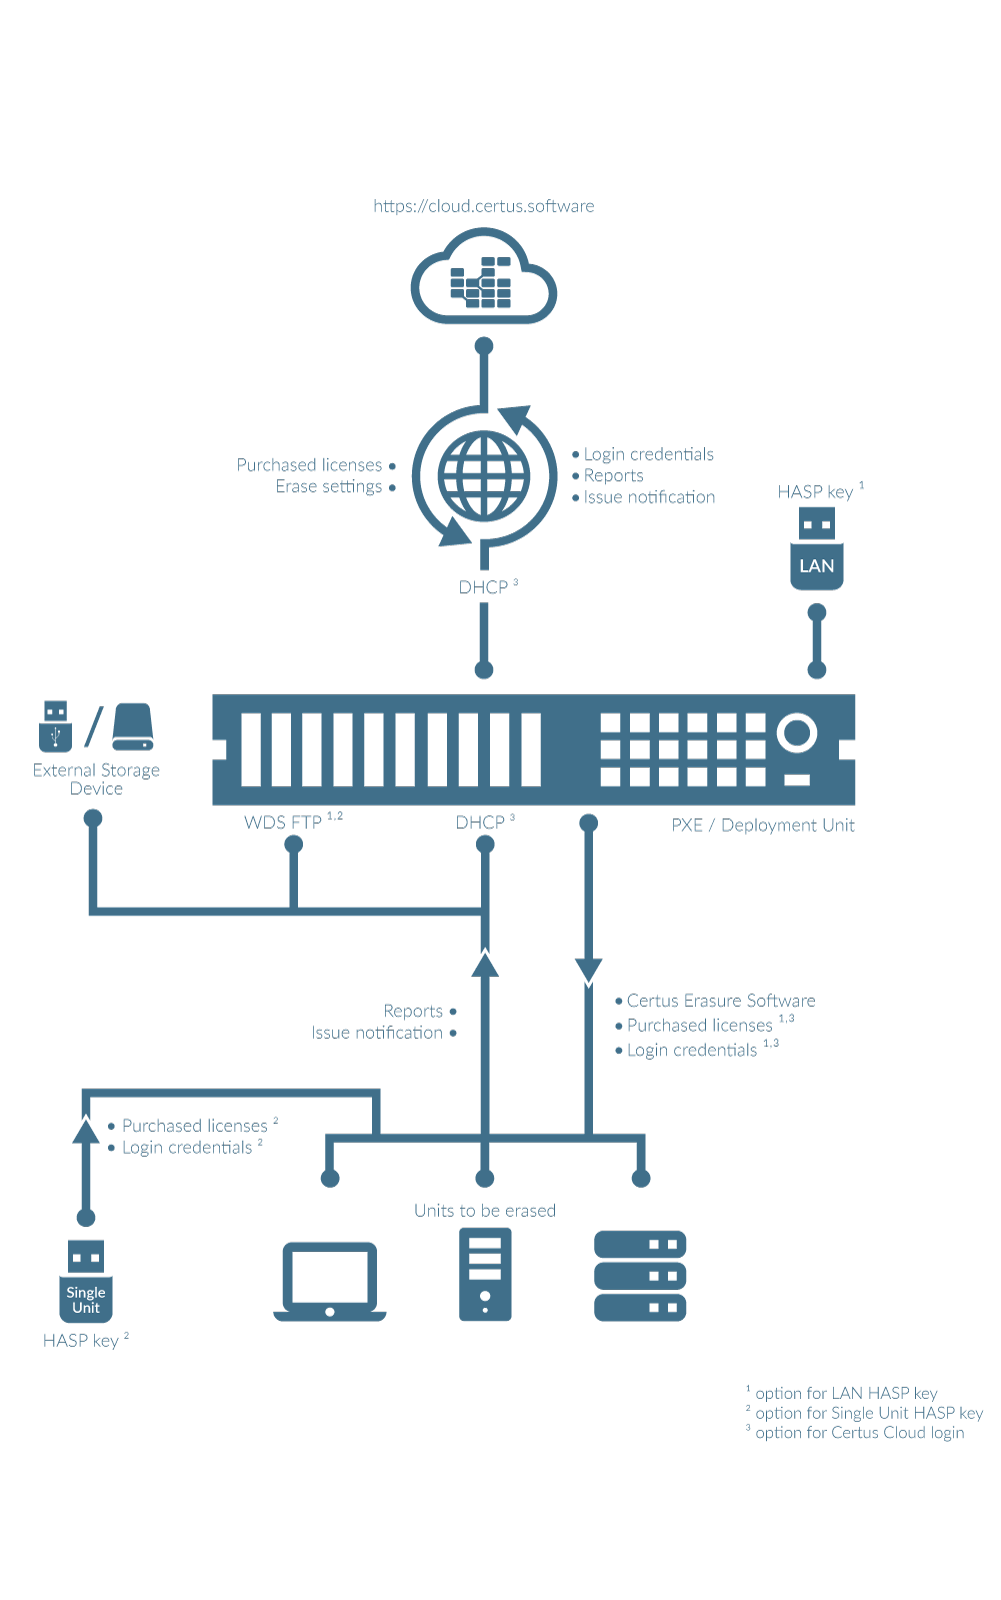
For using the PXE/Deployment solution, a Windows Server with configured Windows Deployment Services (WDS) should be set up according to the instructions. All required images for the deployment are available as download.
Client units and a Deployment Unit should be connected in the same network environment. To start Certus Erasure Software, LAN/PXE boot should be chosen in boot menu or set as default boot source of the client unit.
Online option: an Internet connection by the Deployment Unit is required to login to your Certus cloud account to access purchased licenses and define erasure settings. All network transmissions are protected by security encryption protocol TLS v1.3. Client units receive necessary data from the Certus cloud via DHCP protocol.
Offline option: A LAN HASP Key is needed if the PXE/Deployment solution is used for mass storage erasing. A Single Unit HASP Key is needed for an individual controlled erasure of a target unit using PXE. The keys contain login credentials and purchased licenses.
Online option: all your erasure activities such as erasure and hardware audit reports will be automatically saved in the Certus Erasure Web Manager via DHCP protocol arranged by the Deployment Unit.
Offline option: all your erasure activities such as erasure and hardware audit reports or issue reports could be saved on an external storage device or will be automatically saved at the FTP server arranged by the Deployment Unit. Note that reports can not be saved on the bootable USB drive and HASP Key. Saved reports can be imported to the Certus Software Web Manager. The HASP Key ID should be linked to your Cloud account (available upon request).
ENVIRONMENT
Configure WDS and upload required Certus Erasure images. Connect unit that needs to be erased via local network to the machine with installed PXE/Deployment environment and select LAN/PXE in the boot menu.
Start the PXE/Deployment unit and wait until the WDS services are started. Start the client unit(s) and sign in the Certus Erasure Software using your Certus account login credentials or HASP key.
Select the drives for erasure. Set the necessary erasure pattern and verification level. “Unfreeze” drives if needed and start the erasure process.
After the erasure process has been completed, generate an erasure report and save it on an external storage device, FTP server prepared by the Deployment Unit or in your Certus cloud account via DHCP protocol.